Friday, May 27, 2011

Free Super Easy Typographic Portrait in Photoshop


Step 1

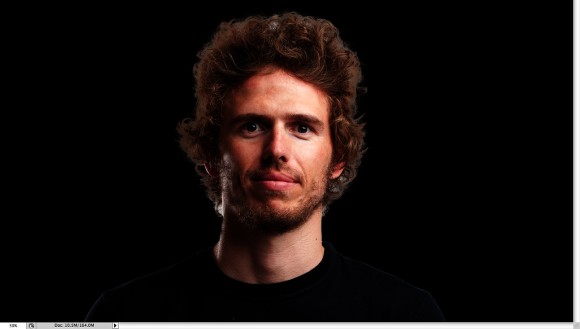
Open Photoshop and create a new document. I used 2560x1440 pixels for the size. Then import a photo of yours, I'm using a portrait taken by a John Arlington, a great photographer friend of mine. The photo I have is with white background, so extract the background.
Super Easy Typographic Portrait in Photoshop

Step 2

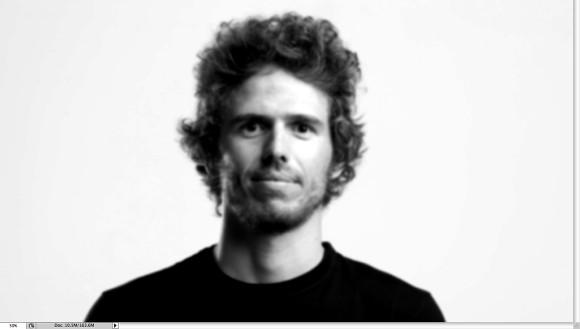
Duplicate the layer and go to Image>Adjustment>Desaturate. You will have a black and white photo. Add a white background. After that save the file, it has to be PSD otherwise it won't work with the Displace filter.
Super Easy Typographic Portrait in Photoshop

Step 3

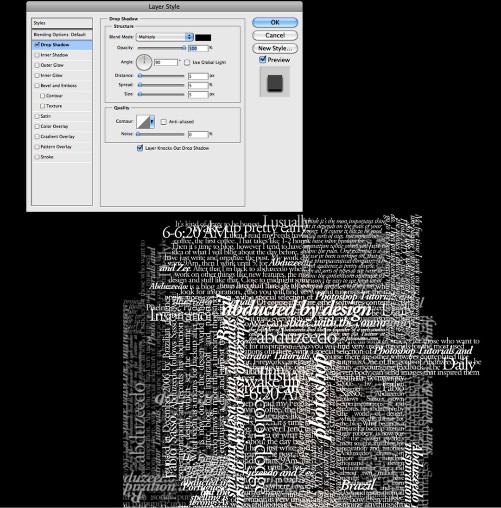
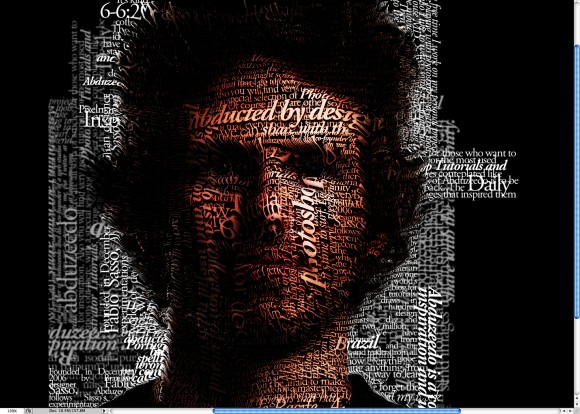
With the Horizontal Type Tool (T) create text boxes and start adding texts. The idea is to play with the texts, they don't have to be readable, or at least with normal legibility, so play with the line-heights, reduce that so the lines overlay one another.
Also make some keywords much bigger and bold, like in my case I highlight some words like Photoshop Tutorials, Illustrator, Inspiration... Also, play with italic, regular texts as well as alignments and text sizes. Tip: I used Garamond for the font, I think serif fonts look much better for this effect.
Super Easy Typographic Portrait in Photoshop

Step 4

For each layer, go to Layer>Layer Style>Drop Shadow. Use Multiply for the Blend Mode, black for the color, 90º for the Angle and 5 pixels for Distance, Spread and Size.
Also, group all the layers and the duplicate the group. Go to Layer>Merge Group and then go to Filter>Blur>Gaussian Blur. Use 10 pixels for the Radius. This blurry layer will have to stay behind the regular one. The idea is to add some depth to your text, that's why the shadow.
You can duplicate the orginal text again and move it a little bit to the top and left as well to add even more depth.
Super Easy Typographic Portrait in Photoshop

Step 5

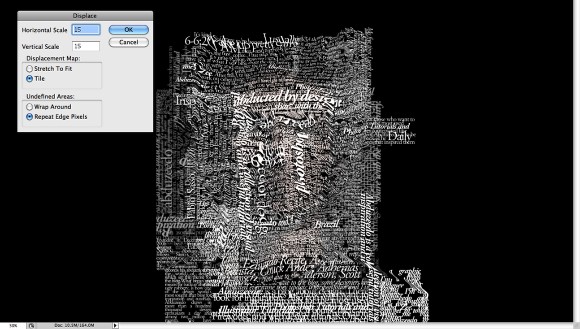
Select all the text layers and merge them into one layer only, then go to Filter>Distort>Displace. A dialog box will appear asking you to choose a file. Select the PSD file we created on the Step 2. After that for the Displace settings use 15 for the Horizontal and Vertical Scale; use Tile for Displacement Map and Repeat Edge Pixels for the Undefined Areas.
The displacement map will distort the layer based on the greyscale photo we used, the dark tones go down while the lights go up.
Super Easy Typographic Portrait in Photoshop

Step 6

Put the photo layer on top of the white text layer, then change the Blend Mode of the photo layer to Light Burn.
Super Easy Typographic Portrait in Photoshop

Step 7

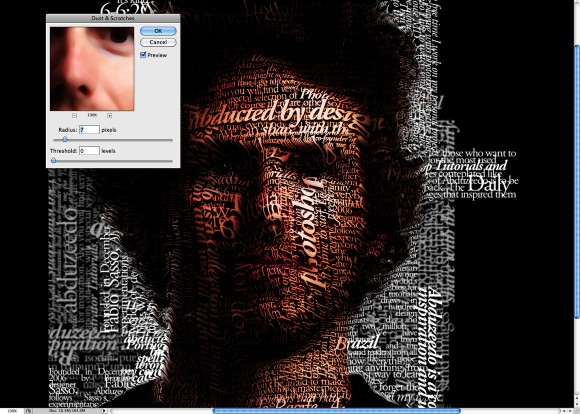
The photo has too many details, so go to Filter>Noise>Dust & Scratches. Use 7 pixels for the Radius and 0 levels for the Threshold.
Super Easy Typographic Portrait in Photoshop

Step 8

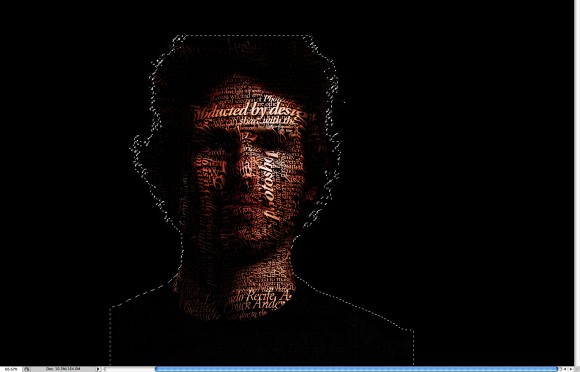
Mask the text layer so you will have just the texts over the photo.
Super Easy Typographic Portrait in Photoshop

Conclusion

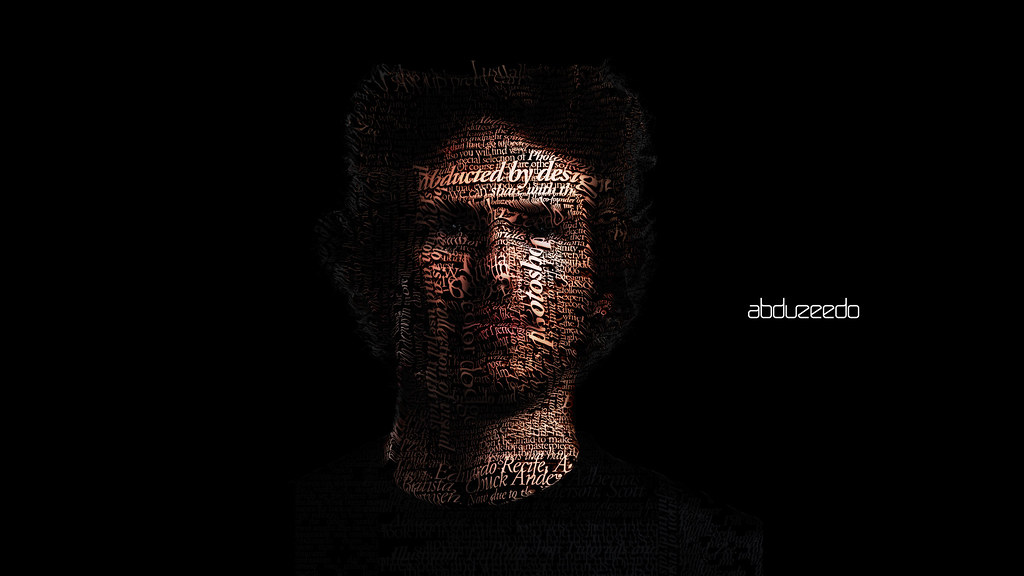
You can reduce a little bit the saturation and as I mentioned before, you can add more text layers and even try different symbols and shapes.
There are many ways to create this effect, this perhaps is the easiest one, but you have to be very careful to make everything very subtle, otherwise the effect won't look as cool as we expect.
TypeFace Experiment in Photoshop

Free Really cool Eclipse Effect in Photoshop


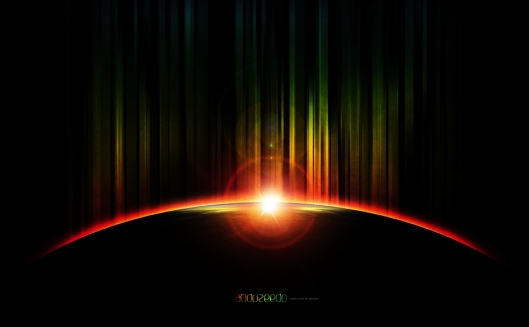
In this tutorial I will show you how I created the Abduzeedo's footer. Some of the techniques I used here I took from other tutorials and also from another tutorial I wrote some time ago for PSDtuts Mix Cool Retro Curves Into Your Photographs. Besides, the design is inspired by the amazing work of James White, so I highly recommend you to check his work out.

As I said before I used some techniques we saw before, from other tutorials. But one of the ideas of this tutorial is learn how to apply what we have learned from this tutorials, and create different effect.

Step 1

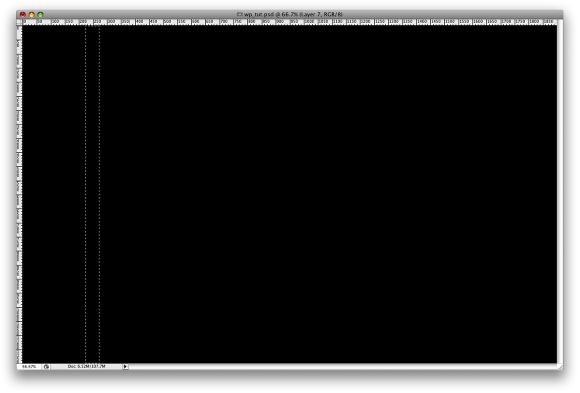
Open Photoshop and create a new document. I used for this tutorial the wallpaper size of 1900x1200 pixels. Right after that fill the background layer with black and with the Rectangular Marquee Tool(M) create a selection like the image below.
Amazing Eclipse Effect like Abduzeedo's footer

Step 2 - Brush

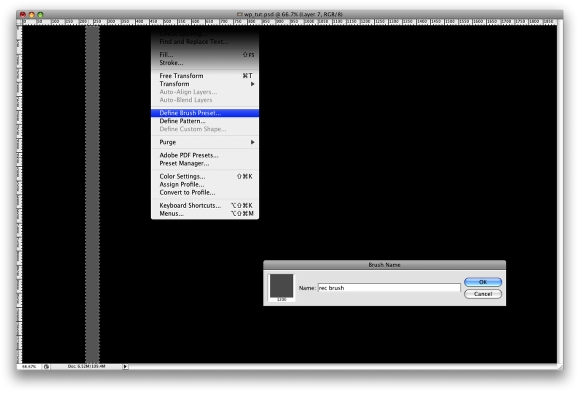
This is exactly what we saw on the other tutorial I wrote, there are just a few differences. But let's repeat the step here.
1 - Add a new layer and fill it with gray.
2 - Go to Edit>Define Brush Preset...
3 - Rename your brush to "Rec Brush".
Amazing Eclipse Effect like Abduzeedo's footer

Step 3

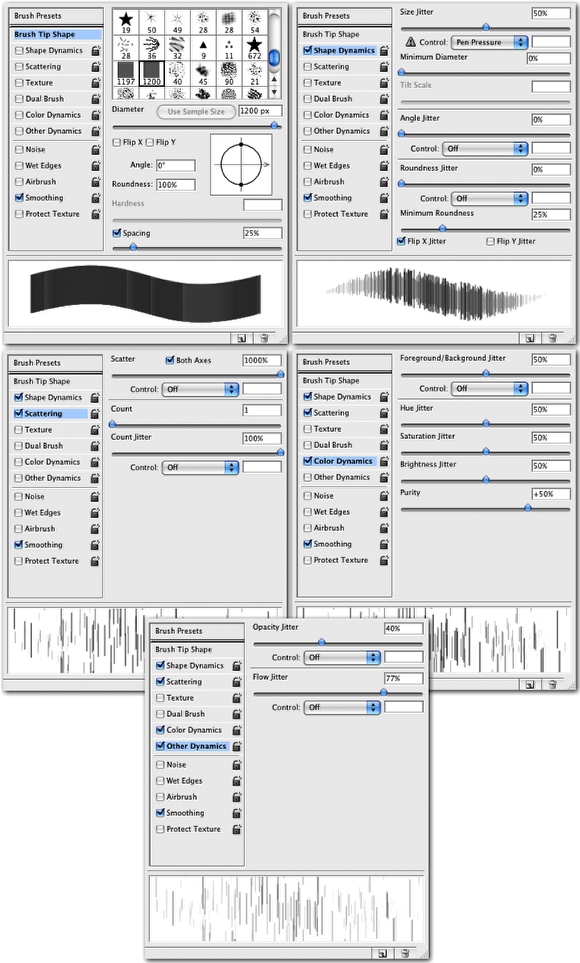
Now let's edit our brush, to do that go to the Brush Engine, Window>Brushes (F5). Basically we will use the Shape Dynamics, Scattering, Color Dynamics and Other Dynamics to create the efect we want. Just follow the image below for reference.
Amazing Eclipse Effect like Abduzeedo's footer

Step 4

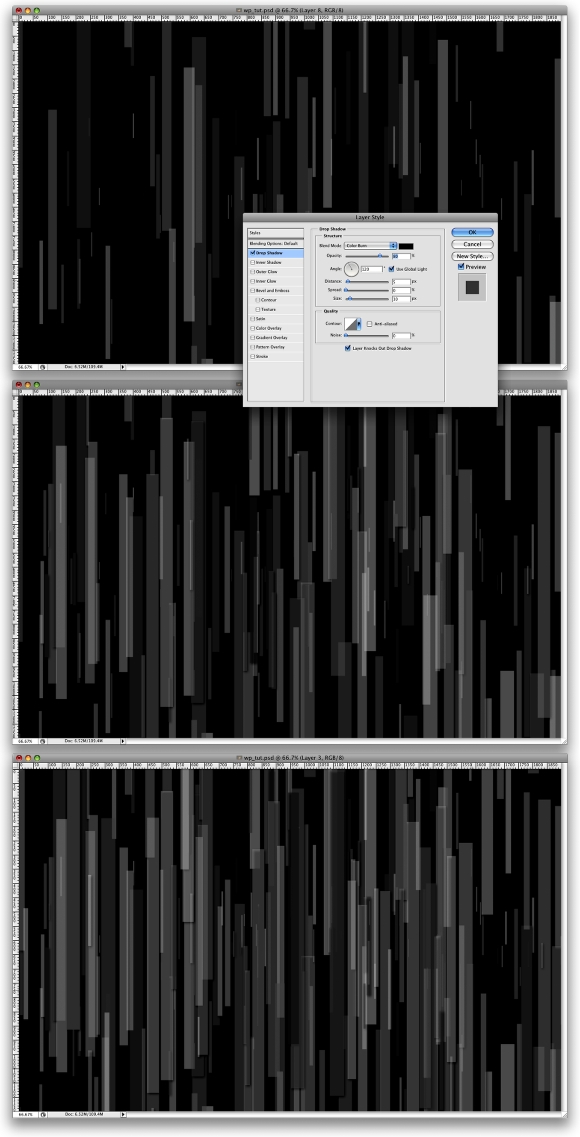
With our custom brush let's create the effect, add a layer and paint some rectangles. After that let's add some Layer Style. Go to Layer>Layer Style>Drop Shadow. Use Color Burn for the Blend Mode, 80% Opacity, 120º Angle, 5px Distance, and 10px Size.
The last thing here is to repeat this step 2 more times. Like create another layer, paint some brush and add the Layer Style.
Amazing Eclipse Effect like Abduzeedo's footer

Step 5

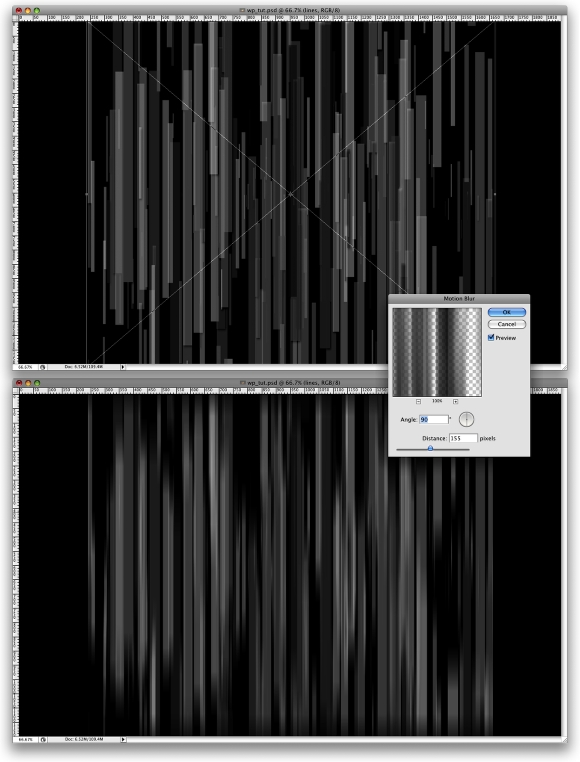
Now let's resize the layer, just horizontally. You can go to Edit>Transform>Scale, or just press CMD+T(mac) or CRTL+T(pc). After that go to Filter>Blur>Motion Blur. Use 90º for the angle and 155 pixels for the distance.
Amazing Eclipse Effect like Abduzeedo's footer

Step 6

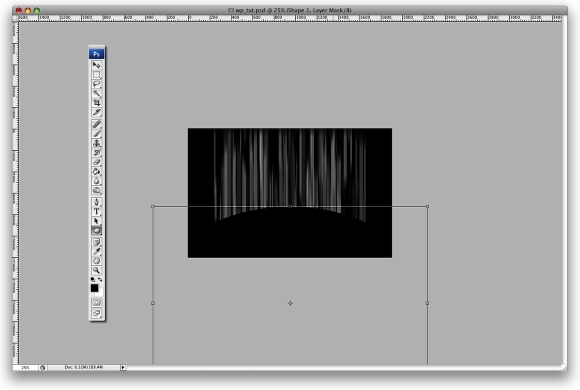
Select the Ellipse Tool (U) and create a big ellipse, it will be the dark planet. Use the image below for reference.
Amazing Eclipse Effect like Abduzeedo's footer

Step 7

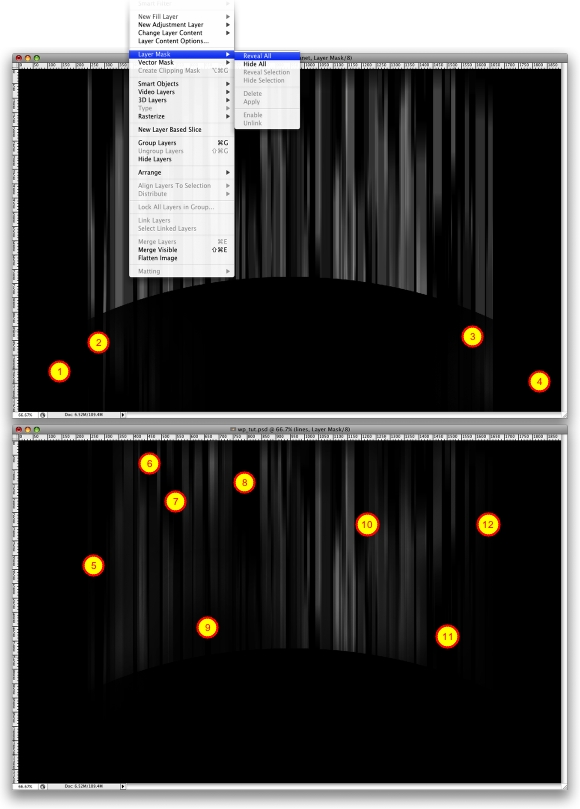
Now let's make some adjustments. Let use Layer Masks to delete some parts of the image and to make others darker. So first select the ellipse layer and go to Layer>Layer Mask>Reveal All. Then select the Brush Tool(B) and big brush, the regular one rounded with 200 pixels, hardness 0%, and the color black. Now just delete some parts of the ellipse (1-4). After that select the rectangles and repeat add a layer mask exactly like we did before. Again select the brush tool, it will be the same preset as the last usage, this time however, change the opacity to 20% and paint some areas to maks some retangles. (5-11).
Amazing Eclipse Effect like Abduzeedo's footer

Step 8

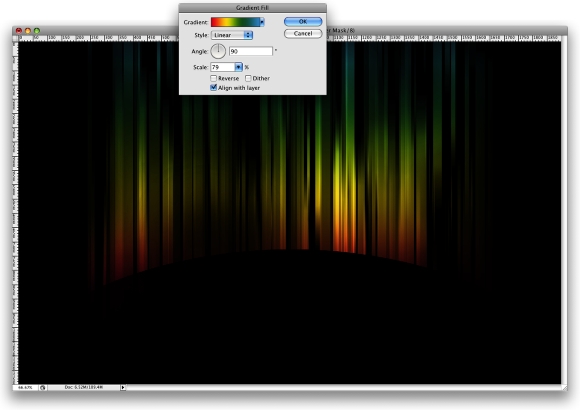
Here let's add some color, I will use Abduzeedo's color. So go to Layer>New Fill Layer>Gradient. Change the angle to 90%, and scale to 80%. After that just change the Blend Mode to Overlay.
Amazing Eclipse Effect like Abduzeedo's footer

Step 9

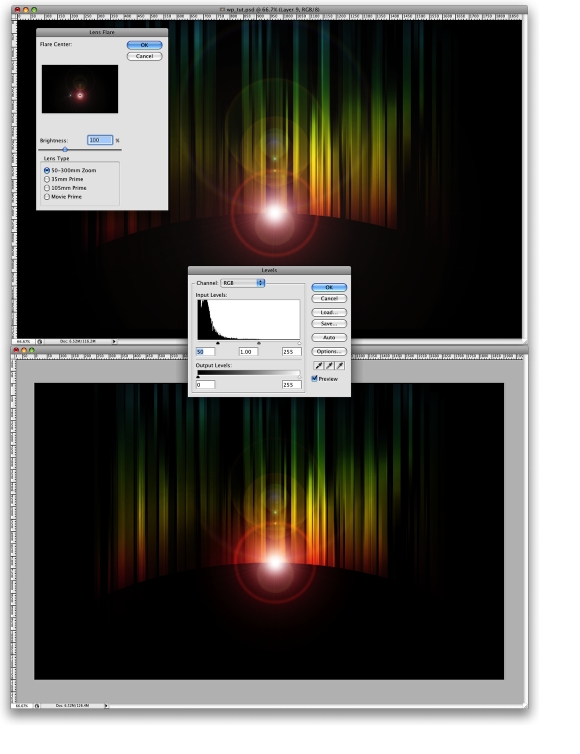
Create a new layer and fill it with black, after that go to Filter>Render>Lens Flare, use 100% for the brightness and the 50-300mm zoom for the Lens Type. Change the blend mode to Screen. You will notice that the layer is too bright, there is too much gray. So go to Image>Adjustments>Levels. Then just change the Input Levels to 50, 1, 255.
Amazing Eclipse Effect like Abduzeedo's footer

Step 10

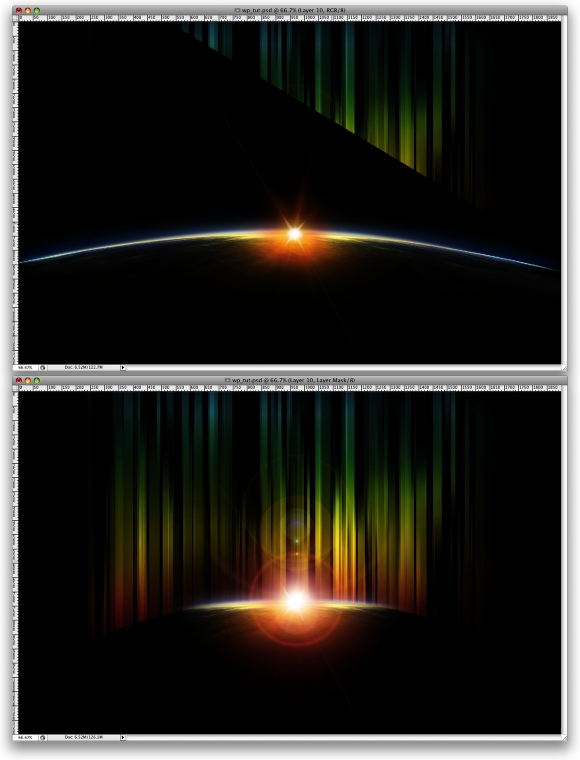
Now let's add a photo from sxc.hu, you can download it here http://www.sxc.hu/photo/986801. Place it in the center of our image. You will have to rotate, and rescale it. Then just change the Blend Mode to Screen too.
After that go to Layer>Layer Mask>Reveal all. Let's repeat the step 7 and delete some parts of the image, do that until you get the result like the image below.
Amazing Eclipse Effect like Abduzeedo's footer

Step 11

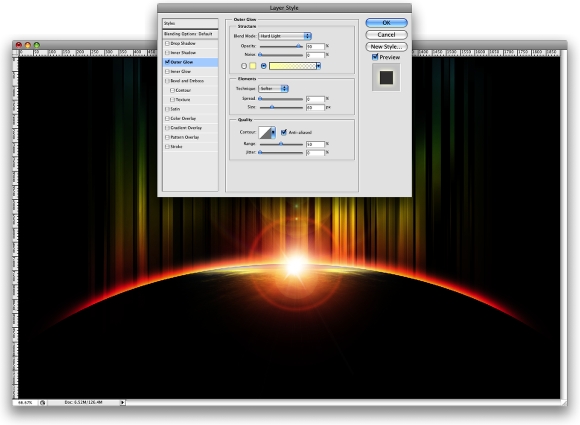
Now select the ellipse layer and go to Layer>Layer Style>Outer Glow. Change the Blend Mode to Hard Light, the opacity to 90% and select the Gradient Color. Use the default yellow and change the size to 60px.
Amazing Eclipse Effect like Abduzeedo's footer

Step 12

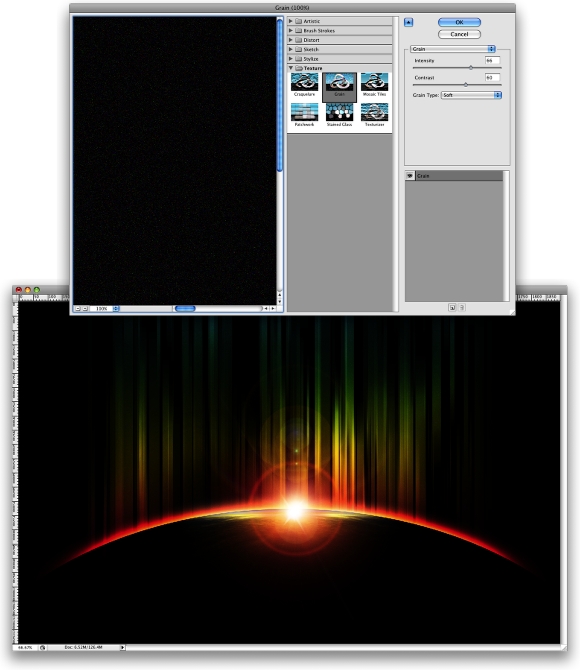
Create a new layer on top of the others, fill it with black and go to Filter>Texture>Grain. Change the Intensity to 66 and the Contrast to 60. After that change the layer's Blend Mode to Soft Light and 60%. You will notice that the image will get a bit darker.
Amazing Eclipse Effect like Abduzeedo's footer

Step 13

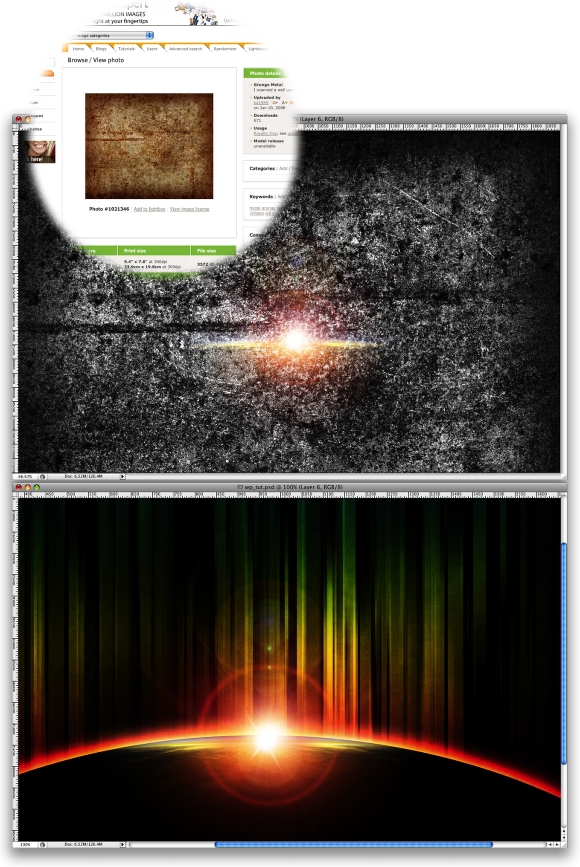
This step is not really necessary but the whole idea is add a bit of texture to the rectangles. So download the texture image from sxc.hu (http://www.sxc.hu/photo/1021346) and place it in the document, right on top of the ellipse layer and beneath the lights. After that reduce its just to make it a bit smaller. Then go to Image>Adjustments>Invert, change the Blend Mode to Overlay and the Opacity to 10%.
Amazing Eclipse Effect like Abduzeedo's footer

Conclusion

There are lots of ways to create this effect, and lots of good tutorials showing how to create that type of eclipse effect, the lines, and the other light effects. But the idea of this tutorial was to mix everything to get a nice result. I hope you like it and now it's all about playing with the tool. ;)
Amazing Eclipse Effect like Abduzeedo's footer

Space Lighting Effects in 10 Steps -Free Photoshop Tutorial


Space Lighting Effects in 10 Steps - Photoshop Tutorial

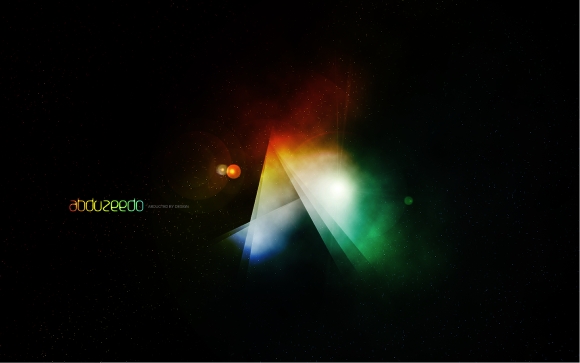
Abduzeedo means abducted in portuguese, the spelling is not exactly that, it should be abduzido. But the whole idea for the Abduzeedo's design is the space. I'm really fan of playing with this subject because we are sort of free to create whatever we want, and using Photoshop that really means everything.

So in this Photoshop tutorial I will show you how to create a space scene with some nice Lighting Effects in 10 Steps.

Step 1

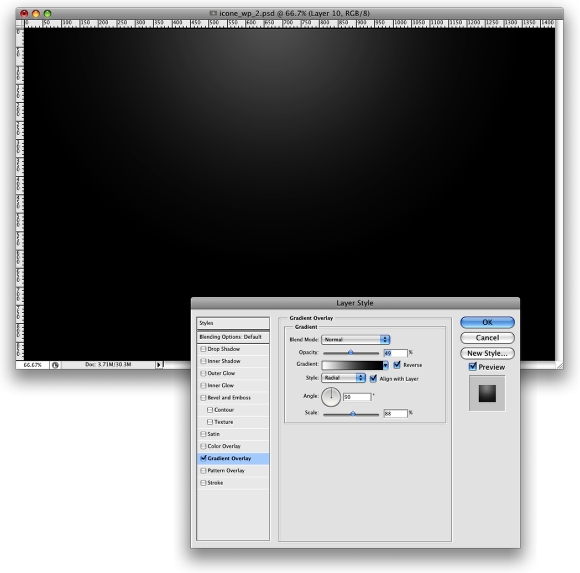
Create a new document, I'm using my computer screen's resolution (1440x900 pixels) so I can use it as a wallpaper later. Add a new Layer and fill it with any color then go to Layer>Layer Styles> Gradient Overlay. You can add a gradient layer as well, I simply prefer the Layer Styles.
Space Lighting Effects in Photoshop | Abduzeedo - abducted by design

Step 2 - Retro Colors

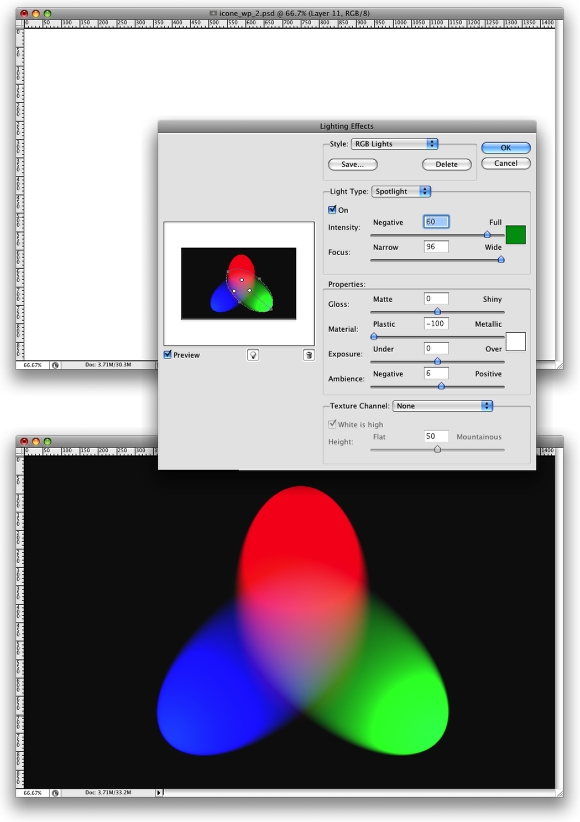
Create a new layer and fill it with white, then go to Filter>Render>Lighting Effects. Change the style to RGB lights. Use Negative 60 for the Intensity, Narrow 96 for the focus, and for the other options keep the same.
Space Lighting Effects in Photoshop | Abduzeedo - abducted by design

Step 3

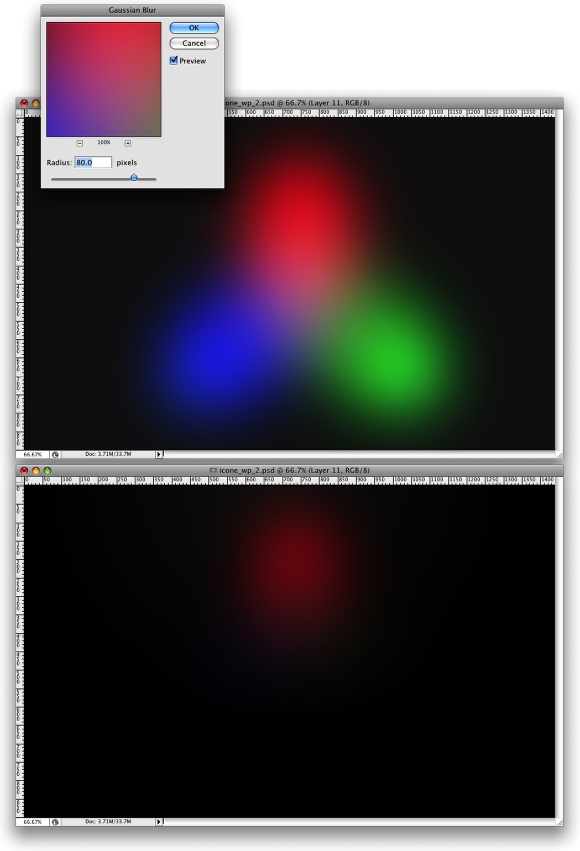
Lets add some blur, go to Filter>Blur>Gaussian Blur. Use 80 pixels for the Radius. The last thing here will be change the Blend Mode to Overlay. Doing that the RGB color will be hardly visible but later on with the other layers it will work ;)
Space Lighting Effects in Photoshop | Abduzeedo - abducted by design

Step 4 - Creating Stars

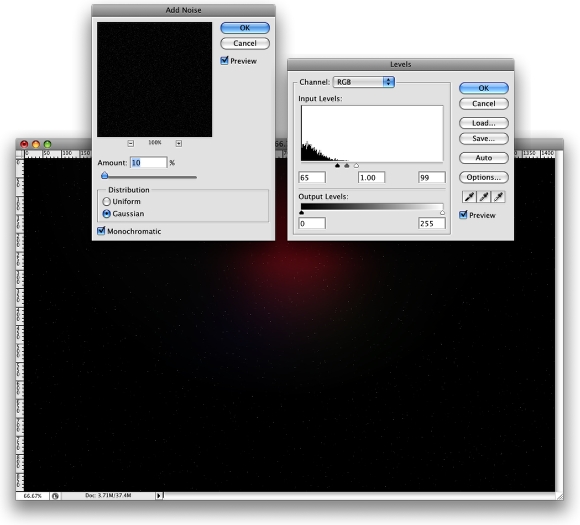
Creating Stars in Photoshop is something really easy. Create a new layer, fill it with black, and change the Blend Mode to Screen. After that go to Filter>Noise>Add Noise. Use 10% for the Amount, Gaussian for the Distribution and select Monochromatic. You will have a layer full of noise, then to create the start just change the levels of the layer, go to Image>Adjustment>Levels. For the Input Levels use 65, 1.00, 99. Doing that you will increase the black so just the bigger dots will appear, also you will increase the white, making the dots that appear brighter.
Space Lighting Effects in Photoshop | Abduzeedo - abducted by design

Step 5 - Nebula

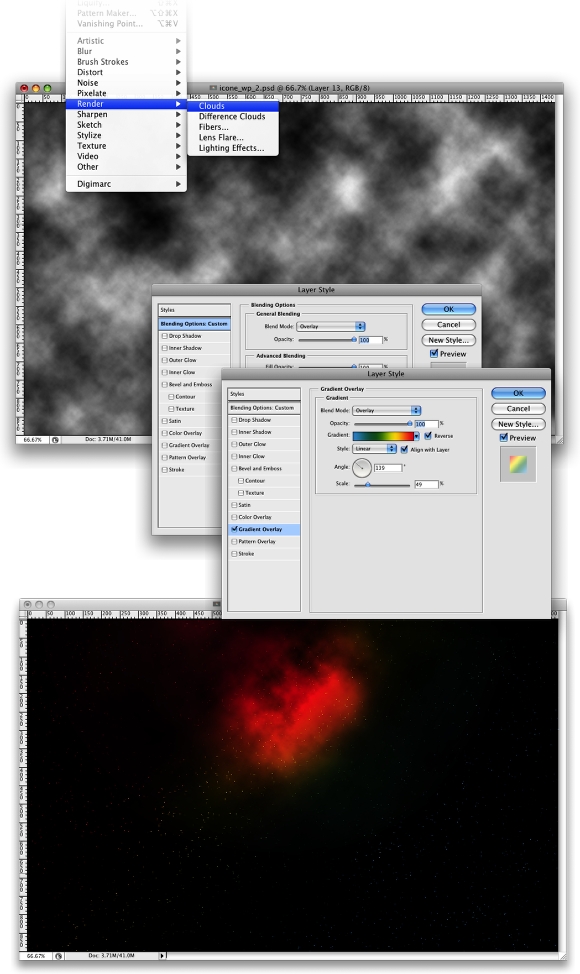
Now that we have the stars and the colors and some colors lets create the Nebula. To do that create a new layer and go to Filter>Render>Clouds. Make sure that your color were black and white for the background and foreground. Then just add some Layer Styles to do that go to Layer>Layer Style. First over the Blending Options, change the Blend Mode to Overlay. After that select Gradient Overlay. use Overlay for the Blend Mode and for the colors use a Cyan, Green, Yellow, and Red. Also change the Angle to 130º and the Scale to 49%.
Space Lighting Effects in Photoshop | Abduzeedo - abducted by design

Step 6 - Lens flare

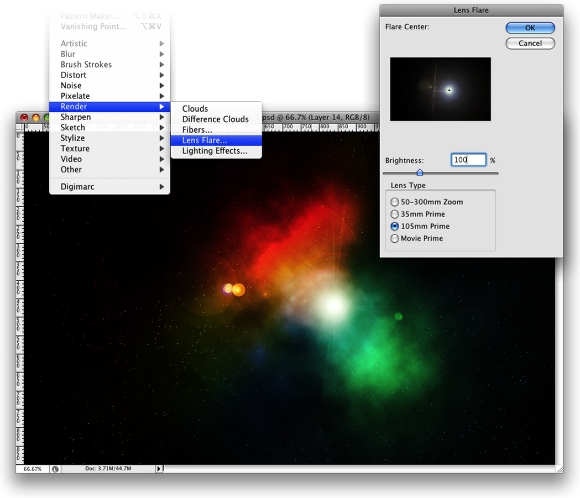
First, lets create a new layer and fill it with black, however, this time, add this layer in front of the background and beneath the other layers: (Stars and Nebula). Now go to Filter>Render>Lens Flare. This effect might be the most overused ever, like some people even say that using it you wil turn your design in an amateur piece. For me it's a nice filter and, if you use it right, it will give a nice touch to your image. For the settings use 100% Brightness and use 105mm Prime for the Lens Type.
Space Lighting Effects in Photoshop | Abduzeedo - abducted by design

Step 7 - Rays of Light

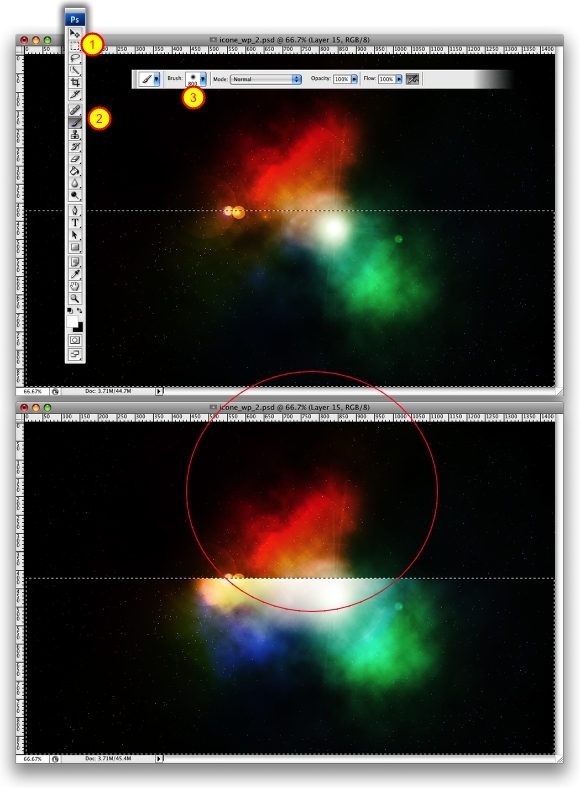
Now lets create the "A" of ray of lights. So create a new layer in front of the Lens Flare. Then select the Rectangular Marquee Tool (M) and create a rectangular selection like half of the height of the document. Use the image below for reference. After that select the Brush Tool (B). We will use a very big brush, 800px diameter and hardness 0%. Select white for the color and with just like a a bit of the brush inside the marquee (red circle) give a few clicks on the mouse button.
Space Lighting Effects in Photoshop | Abduzeedo - abducted by design

Step 8

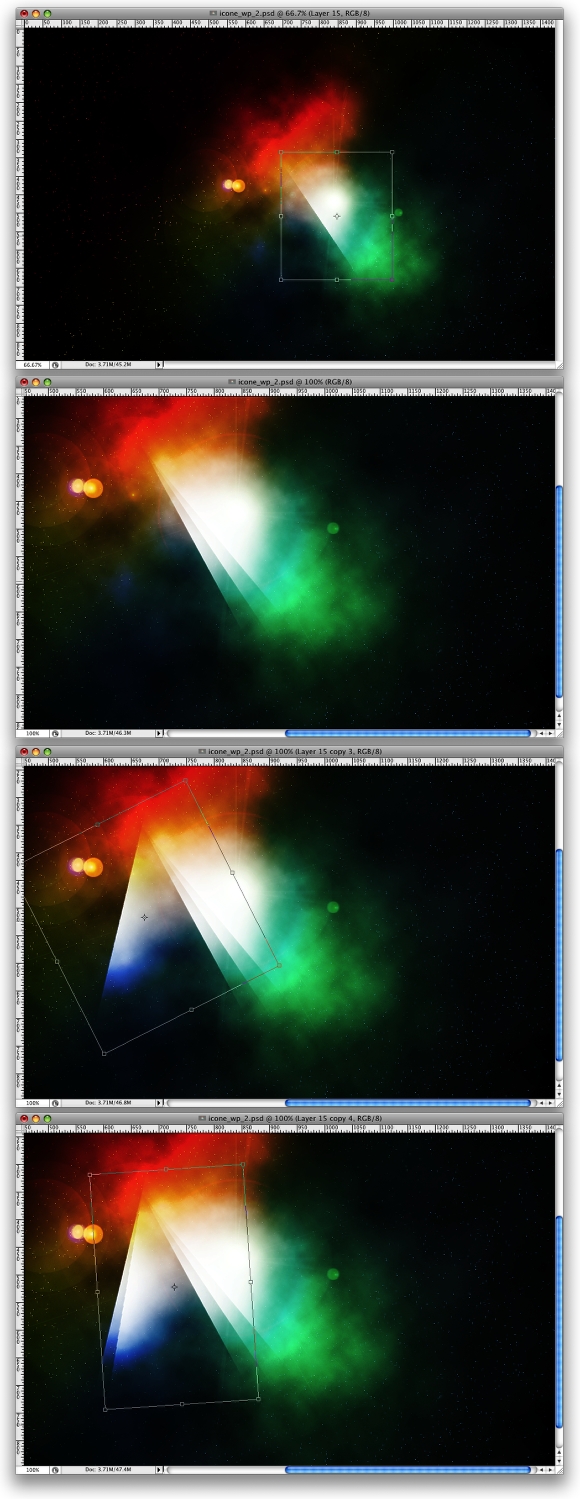
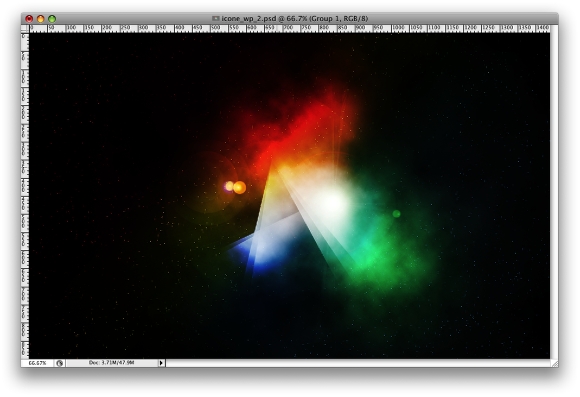
Now it's just about duplicating, resizing and rotating. The tip here is convert the original ray of light layer to Smart Objects, so you will be able to resize and rotate in a non-destructive way. After you create the "A", change the blend mode of the elements to Screen and use 80% opacity.
Space Lighting Effects in Photoshop | Abduzeedo - abducted by design

Step 9 - Adjustments

Now lets just adjust some opacities, change the the RGB light opacity to 80% and you can move the gradient overlay to test different color combinations as well.
Space Lighting Effects in Photoshop | Abduzeedo - abducted by design

Conclusion

In this tutorial we've learned how to create a very cool light effect that we often see is some of the NoPattern designs. Of course this tutorial was just an example and now you can improve it and apply it to your needs.
Space Lighting Effects in Photoshop | Abduzeedo - abducted by design

Free Creating Smoke Effect in Photoshop


Some time ago I had posted an article showing how to create a smoke effect in photoshop, and to achieve that I used a photo of smoke and some photoshop filters. However, some people had said at the time that I should have done the smoke as well and it´s exactly what I will show on this post right now.

I had previously thought about what would be the best way to create smoke in photoshop, and I’ve read some tutorials online and watched some episodes of the amazing pixelPerfect podcast, to find a good and easy solution for the matter at hand.
Actually it was easier than I had expected.

1 - Create some Shapes: I created some random shapes.
Create some random shapes

2 - Apply a Gaussian blur on each shape

Create some random shapes

3 - Using the liquify filter

Create some random shapes

4 - Positioning the shapes

Create some random shapes

5 - Adding some colors

Use the Hue/Saturation with the colorize selected to add some colors
Add a background color on the layer of the shape, otherwise the Hue/Saturation won't work

6 - Creating a cloud behind the smoke

Creating the cloud
Set a feather with a high value, like 40 to 80, and after that apply the hue/saturation on the cloud too

7 - Adding a gradient to create an atmosphere

Create some random shapes
The gradient will give a atmosphere and more depth to the image

Final Result

Create some random shapes
The whole process took me about 30 to 40 minutes tops, it’s pretty simple, although it can be quite hard to create a n

Thursday, May 19, 2011

Exploding Text

Kaboom! Exploding Text

Step 1
Create new document (Ctrl+N), any size (I used 900×600), then fill up the layer with #000000. Name this layer “Background”. Create new layer (Ctrl+Shift+N) and fill it with #090e12. Name the layer “Bg Light” and add a layer mask to it. With the mask selected, grab the Gradient (G) tool, set it to Radial Gradient, press D to reset the foreground and background colors to default and drag the Gradient tool from the center of the document towards the edge to get a circular light effect.
Kaboom! Exploding Text

Step 2

Time to create some fog/smoke. Create a new empty layer, name it “Smoke”. Make sure you’ve got the default colors on (press D), go to Filter › Render › Clouds. Set the blending mode to Soft Light.
Kaboom! Exploding Text

Step 3

Time to insert our 3DS Max rendered text. Unfortunately how to achieve the text effects in 3DS Max is not the object of this tutorial, so you must know your way around it before you actually start this tutorial. Basic directions would be to create the text letter by letter, arranging each one in a different position as if they’d be blown away. Give it a Bevel modifier, set up the lighting and an optional camera for rendering angles. Set up the materials so that the text reflects the environment to give it that cool shiny effect. Render it at 1600×1200 or more so that it will be easier to cut out the background in Photoshop without any weird edges.
Anyway, we’ll be creating everything else in relation to this text so after you cut out the background, paste it in your document and adjust its size accordingly. Let’s name this layer “Kaboom” and set its Blending Mode to Luminosity for later on.
Kaboom! Exploding Text

Step 4

Next up, we’re going to create some smoke effect behind the text. Create a new layer below the Kaboom layer, select the Lasso tool (L) and draw up a distorted selection around the text. Feather (Ctrl+Alt+D) the selection by, say, 30px, then go to Filter › Render › Clouds. Press L to bring up the Levels window and play with the Red, Green and Blue levels until you get an orange color with strokes of reddish orange here and there. Set the layer style to Pin Light, duplicate the layer, Transform it (Ctrl+T) and flip it horizontally. Duplicate the layer again and set its Blending mode to Hue.
Kaboom! Exploding Text

Step 5

Some more smoke and light effects. Grab the lasso tool again and draw a selection in the same way you did on Step 4, except this time draw it in a more “circular” shape (meaning not so spread horizontally). If this explanation fails to do it, just take a look at the image below :) Feather the selection again by 30-40px and fill it up with clouds (Filter &rsaquo Render › Clouds). Set the Blending Mode to Color Dodge, now duplicate that layer and set its blending to Hue. Create a new Levels Adjustment Layer Adjusment Layer Button above the last layer we just made and press Ctrl + Alt + G to group it with the layer below. This gives the effects created with the adjustment layer only to the grouped layer. Set it as you see below:
Kaboom! Exploding Text
1 2 3 4

Now you should have the following result, or similar:
Kaboom! Exploding Text

Step 6

Next we will add motion effect to the text. Duplicate the Kaboom layer, go to Filter › Blur › Radial BlurAmount: 10, Blur Method: Zoom, Quality: Best. Apply a circular gradient layer mask, then set Blending Mode to Overlay. Duplicate the Kaboom layer again, apply a Radial Blur as follows: Amount: 40, Blur Method: Zoom, Quality: Best, give it the same type of mask as above and set the Blending Mode to Overlay. Press Ctrl + L to play with the Levels and give it a bit of a golden color. Duplicate the Kaboom layer one last time, apply a Radial Blur of 80, same other settings as above, bring up the Layers window (Ctrl + L) and give it an orange type of color. Move this layer below the Kaboom layer.
Kaboom! Exploding Text

Step 7

Let’s add one more light burst effect. Create a new layer, grab the Lasso tool and draw a selection with an irregular shape. Feather the selection (Ctrl+Alt+D) with about 20px, then press Ctrl + L and give your shape a red-ish color (view the images below for details). Give it a Radial Blur of about 80, Blur Method: Zoom, Quality: Best. Duplicate this layer and press Ctrl + T to transform it, scale it to about 70% then modify the Levels (Ctrl + L) to give it a light orange color. Duplicate this layer once.
Kaboom! Exploding Text
1 2 3 4

Step 8

Time for some more light effects. Create a new layer. Select the Pen tool (P), make sure you have the Paths mode selected and draw a wavy shape like in the image below. Select the Brush tool and set it like shown below.
Kaboom! Exploding Text
1 2 3 4 5

Select the Pen again, right-click and select “Stroke Path”, then select Brush from the drop-down menu and make sure you have “Simulate Pressure” checked, then click OK. You should now have something that looks similar to the swirl in the image below. Give it a Color Overlay of #ffdf72, then select and erase the areas shown below to give the swirl a 3D effect, as if it would revolve around the text. Add a Mask to this layer, select the Gradient tool with a linear gradient and use it on the mask so that the swirl is transparent in the middle and opaque on the edge. Duplicate this layer and using the Gradient tool draw the same type of gradient, but in such a way so that the swirl is still transparent in the middle, but opaque on the opposite edge.
Kaboom! Exploding Text
Create new layer, grab the Brush tool and set it pretty much the same as above, except that you should use a larger size brush, say 10-15 and Scattering should be about 600%. Use the brush a couple of times until you get an effect like the one below.
Kaboom! Exploding Text

Step 9

And for our final step, we’ll add some texture. I got my texture from sxc.hu but you don’t have to use the same one, you can use any texture you think would work. Select the Kaboom layer, paster your texture in the document, scale it down a bit so that the texture details are sharp, set the layer blending mode to Multiply.
Kaboom! Exploding Text
Holding Ctrl click on the thumbnail of the Kaboom layer to create a selection after its shape, then click the Add Layer Mask button to do just that, add a layer mask in the shape of the text. This ensures the fact that our texture does not flow outside the boundaries of the text.
Kaboom! Exploding Text
And there you have it: exploding text. :) I hope you enjoyed it at least as much as I did making it. If you’ve got any thoughts, comments or critiques please do leave a comment – I love to hear from you. :) If you happen to have an idea for one of my next tutorials, don’t be shy, let me know and if it’s interesting enough I will try to make it happen for you.